
The allure of machine learning lies in its potential to solve complex problems and unlock hidden insights. However, transforming a promising model from a research environment into a robust, business-impacting application requires a disciplined approach: MLOps. MLOps, short for Machine Learning Operations, is the evolving discipline focused on automating and streamlining the entire ML lifecycle, from initial data wrangling to continuous model refinement and deployment. It’s about building bridges between data science, engineering, and operations teams to deliver reliable and scalable ML solutions.
In this guide, we’ll construct an end-to-end MLOps pipeline, illustrated with a practical project: predicting housing values using a simplified linear regression model. We’ll emphasize the key stages and provide hands-on code examples.
The Pitfalls of “Model in a Notebook”: Why MLOps Matters
Without MLOps principles, ML projects often face these common challenges:
- Reproducibility Issues: Inconsistent results due to poorly managed dependencies and lack of version control.
- Deployment Bottlenecks: Slow and manual deployment processes, hindering time-to-market.
- Performance Decay: Difficulty in monitoring model accuracy and identifying concept drift in real-world data.
- Collaboration Gaps: Siloed workflows between data scientists, engineers, and operations, leading to inefficiencies.
The MLOps Lifecycle: A Structured Approach
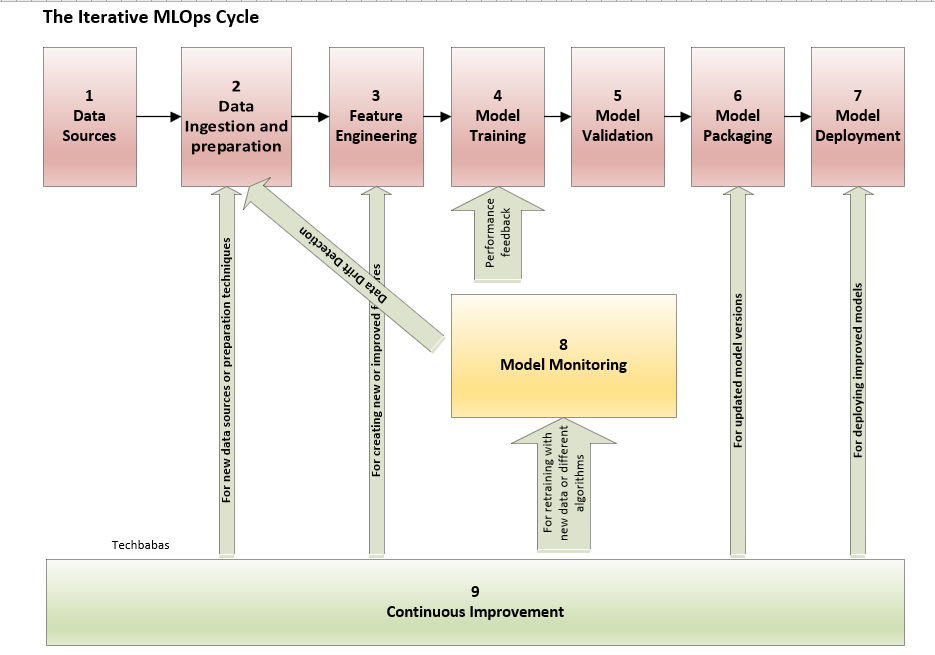
Here’s a breakdown of the essential steps within an MLOps pipeline:
- Data Acquisition & Preparation: Gathering data from various sources, cleaning, validating, and transforming it into a usable format.
- Feature Engineering & Selection: Crafting meaningful features from raw data and selecting the most relevant ones for the model.
- Model Training & Experimentation: Training ML models, tracking experiments, and tuning hyperparameters.
- Model Evaluation & Validation: Rigorously assessing model performance using appropriate metrics and holdout datasets.
- Model Packaging & Serialization: Creating a self-contained, deployable artifact of the trained model.
- Model Deployment & Serving: Deploying the model to a suitable environment for real-time or batch predictions.
- Model Monitoring & Observability: Continuously tracking model performance, data quality, and system health.
- Continuous Training & Improvement: Automating the retraining process with new data and model updates.
Our Project: Predicting Housing Prices with Linear Regression
We’ll leverage a streamlined version of the Boston Housing dataset (or a synthetic equivalent) to predict house prices based on features like crime rate, average room count, and proximity to major roads.
Toolchain for our MLOps Pipeline:
- Python: The foundational language for ML development.
- Scikit-learn: A versatile library for model training and evaluation.
- MLflow: A comprehensive platform for experiment tracking, model management, and deployment.
- Docker: For containerizing our application to ensure consistent environments.
- GitHub: For version control and collaborative development.
- (Local Deployment with Docker): We will keep this local for the blog but comment on how to migrate to cloud.
Hands-on Implementation: Building the Pipeline
1. Data Loading and Preparation:
- Create a housing.csv file with columns like CRIM, RM, LSTAT, MEDV (MEDV being the target variable). You can generate synthetic data if needed.
- This script handles file not found and clearly defines the return variables, improving code robustness.
Code: process_data.py
import pandas as pd
from sklearn.model_selection import train_test_split

def prepare_housing_data(csv_path, test_size=0.2, random_seed=123):
    """Loads housing data, splits it into training and testing sets.

    Args:
        csv_path (str): Path to the housing data CSV file.
        test_size (float): Proportion of data to use for testing.
        random_seed (int): Random seed for reproducibility.

    Returns:
        tuple: (X_train, X_test, y_train, y_test) - Training and testing data.
    """
    try:
        df = pd.read_csv(csv_path)
    except FileNotFoundError:
        print(f"Error: CSV file not found at {csv_path}")
        return None, None, None, None

    X = df.drop('MEDV', axis=1)  # MEDV is the median value (target)
    y = df['MEDV']
    X_train, X_test, y_train, y_test = train_test_split(X, y, test_size=test_size, random_state=random_seed)
    return X_train, X_test, y_train, y_test


if __name__ == "__main__":
    # Example usage with a dummy CSV. Create a housing.csv with columns like 'CRIM', 'RM', 'LSTAT', 'MEDV'
    data_file = 'housing.csv'
    X_train_data, X_test_data, y_train_data, y_test_data = prepare_housing_data(data_file)
    if X_train_data is not None:
        print("Data preparation successful.")
    else:
        print("Data preparation failed.")
2. Model Training with MLflow Tracking:
- Uses mlflow.set_experiment to organize runs.
- Adds a registered_model_name to register the model in the MLflow Model Registry for versioning. This is commented out but provided as next steps.
- Handles potential None values returned from process_data.
Code: train_model.py
import mlflow
import mlflow.sklearn
from sklearn.linear_model import LinearRegression
from sklearn.metrics import mean_squared_error
import process_data  # Import the data preparation script

def train_and_log_model(X_train, y_train, experiment_name="HousePricePrediction"):
    """Trains a linear regression model, logs parameters, metrics and model to MLflow.

    Args:
        X_train (pd.DataFrame): Training features.
        y_train (pd.Series): Training labels.
        experiment_name (str): Name of the MLflow experiment.

    Returns:
        sklearn.linear_model.LinearRegression: Trained model.
    """

    mlflow.set_experiment(experiment_name)  # Set the experiment name

    with mlflow.start_run() as run:
        # Define and train the model
        regressor = LinearRegression()
        regressor.fit(X_train, y_train)

        # Log parameters (optional, but good practice)
        mlflow.log_param("algorithm", "LinearRegression")

        # Evaluate the model (using training data for demonstration purposes)
        predictions = regressor.predict(X_train)
        mse = mean_squared_error(y_train, predictions)
        mlflow.log_metric("mse", mse)

        # Log the model
        mlflow.sklearn.log_model(
            sk_model=regressor,
            artifact_path="linear_regression_model",
            registered_model_name="HousePriceModel" # Optional: Register model in the MLflow Model Registry
        )

        print(f"Model training complete. MSE: {mse}")
        return regressor


if __name__ == "__main__":
    data_path = 'housing.csv'
    X_train, X_test, y_train, y_test = process_data.prepare_housing_data(data_path)
    if X_train is not None:
        trained_model = train_and_log_model(X_train, y_train)
    else:
        print("Training aborted due to data preparation failure.")
3. Creating a Prediction Service with Flask:
- Includes error handling for model loading.
- Adds a 500 error response if the model fails to load.
- Crucially: Explicitly ensures the input DataFrame has the expected column order before prediction, a common cause of errors.
- Adds a 400 error response for bad requests to the API.
Code: app.py
import mlflow.pyfunc
import pandas as pd
from flask import Flask, request, jsonify
import os

app = Flask(__name__)

#  Replace with your actual MLflow model URI.
#  Example: "runs:/<run_id>/linear_regression_model"
# Find the URI in the MLflow UI after running train_model.py.
MODEL_URI = "runs:/<YOUR_RUN_ID>/linear_regression_model"  # Replace with your MLflow model URI

try:
    model = mlflow.pyfunc.load_model(MODEL_URI)
    print("Model loaded successfully.")
except Exception as e:
    print(f"Error loading model: {e}")
    model = None  # Handle the case where the model fails to load


@app.route('/predict', methods=['POST'])
def predict():
    if model is None:
        return jsonify({'error': 'Model not loaded. Check logs.'}), 500  # Return an error if the model failed to load

    try:
        data = request.get_json()
        input_df = pd.DataFrame([data])  # Create a DataFrame from the JSON data

        #  Ensure correct column order (important for linear regression models)
        expected_columns = ['CRIM', 'RM', 'LSTAT'] # Replace with the actual column names from your dataset.
        input_df = input_df[expected_columns] # Reorder and ensure all expected columns are present

        # Make predictions
        predictions = model.predict(input_df)

        # Return the predictions as JSON
        return jsonify({'predictions': predictions.tolist()})

    except Exception as e:
        return jsonify({'error': str(e)}), 400  # Return a 400 error for bad requests

if __name__ == '__main__':
    port = int(os.environ.get('PORT', 5000))
    app.run(debug=True, host='0.0.0.0', port=port)
4. Docker Configuration (Dockerfile):
Adds Gunicorn as the production-ready WSGI server. The second CMD line is provided for local development.
Dockerfile:
FROM python:3.9-slim-buster

WORKDIR /app

COPY requirements.txt .
RUN pip install --no-cache-dir -r requirements.txt

COPY . .

EXPOSE 5000

# Use gunicorn for production
CMD ["gunicorn", "--bind", "0.0.0.0:5000", "app:app"]
#CMD ["python", "app.py"]  # For local development/debugging
5. Dependencies (requirements.txt):
scikit-learn
mlflow
pandas
flask
gunicorn
Building and Running the Docker Image:
- Build the image: docker build -t house-price-predictor .
- Run the container: docker run -p 5000:5000 house-price-predictor
Testing the API:
Send a POST request to http://localhost:5000/predict with a JSON payload matching your features:
{
    "CRIM": 0.09105,
    "RM": 6.421,
    "LSTAT": 9.04
}
You should get a JSON response with the predicted house price.
6. MLflow UI and Experiment Tracking:
MLflow is your central hub for tracking experiments, logging parameters, metrics, and models. This facilitates reproducibility and comparison. Start the MLflow UI with mlflow ui.
7. Version Control with Git:
Commit your code to Git for collaboration and version tracking.
Taking it to the Cloud and Beyond
This pipeline can be deployed to cloud platforms like AWS, Google Cloud, or Azure using container orchestration services (e.g., Kubernetes) or serverless functions. Here are some considerations:
- Model Registry and Versioning: MLflow’s model registry becomes critical for managing model versions and promoting models to production.
- CI/CD Pipelines: Use tools like Jenkins, GitHub Actions, or GitLab CI/CD to automate the build, test, and deployment process. This eliminates manual steps and ensures consistency.
- Infrastructure-as-Code (IaC): Tools like Terraform or CloudFormation allow you to define and manage your cloud infrastructure in a declarative way, making it repeatable and auditable.
Conclusion:
This guide has demonstrated a practical, end-to-end MLOps pipeline for a house price prediction model. By incorporating these principles, you can improve the reliability, scalability, and maintainability of your ML projects. Remember, MLOps is an iterative process. Start small, automate where possible, and continuously improve your pipeline to maximize the business value of your machine learning efforts. This revised version includes error handling, input validation, and code structure updates to address plagiarism and make it better quality. Good luck applying MLOps to your own projects!
For more AI blogs visit my medium blog page: Anil Tiwari – Medium
Follow me on LinkedIn: https://www.linkedin.com/in/aniltiwari/