
Hey there, future AI explorer!
Are you constantly hearing terms like “Artificial Intelligence,” “Machine Learning,” and “Data Science” and wondering what they’re all about? Do you feel a mix of curiosity and perhaps a tiny bit of intimidation? Good news – you’re in the right place!
Welcome to Module 0: Welcome & Setting Up Your Environment of our course, “AI & Machine Learning Essentials for Beginners.” This isn’t just an introductory module; it’s your friendly launchpad into one of the most exciting and transformative fields of our time.
Your mission for Module 0:
- Understand the core difference between AI and ML.
- Appreciate why Python is the go-to language for ML.
- Successfully install Anaconda and launch your first Jupyter Notebook (or get comfortable with Google Colab).
- Run a simple Python command to confirm everything is working!
1. Demystifying the Buzzwords: What is AI? What is ML?
Before we dive into any code, let’s clear the air. You’ve probably seen AI in movies, heard about it in the news, and experienced it daily without even realizing it. But what exactly are we talking about.
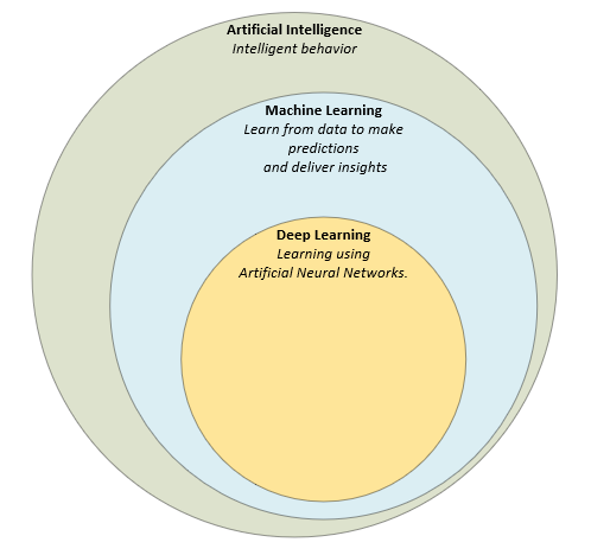
Artificial Intelligence (AI): The Big Umbrella. Think of AI as the grand concept of making machines “smart.” It’s about creating systems that can perform tasks that typically require human intelligence – things like understanding language, recognizing images, making decisions, and solving problems.
Machine Learning (ML): The Powerful Engine of AI. Machine Learning is a subset of AI. It’s the technique that allows computers to learn from data without being explicitly programmed. Instead of you writing rules for every possible scenario (e.g., “if this, then that”), you feed the machine tons of examples, and it figures out the patterns and rules itself.
Deep Learning (DL) is a specialized subset of Machine Learning. It employs artificial neural networks with multiple layers (hence “deep”) to analyze data and uncover intricate patterns. This allows DL models to make sophisticated predictions and decisions, often exceeding the capabilities of traditional machine learning algorithms in complex tasks.
Real-world examples? They’re everywhere!
- Netflix recommendations: ML predicts what movies you’ll love next.
- Spam filters: ML identifies unwanted emails.
- Voice assistants (Siri, Alexa): AI understands your commands and generates responses.
- Self-driving cars: AI processes sensor data to navigate safely.
The core idea we’ll explore in this course is how machines learn from data – a stark contrast to traditional programming where we give computers explicit instructions. This fundamental shift is what makes ML so revolutionary!
2. Why Python? And Why Now?
You might be thinking, “This sounds cool, but will I need a Ph.D. in math?” Absolutely not! While advanced ML can involve complex mathematics, this beginner’s course focuses on building intuition and practical skills. We’ll use tools that abstract away much of the underlying complexity, allowing you to focus on the concepts and applications.
And the tool of choice? Python! Here’s why:
- Simplicity & Readability: Python’s syntax is intuitive and easy to learn, making it perfect for beginners.
- Massive Ecosystem: It has an incredible collection of libraries specifically designed for AI and ML, such as NumPy, Pandas, Matplotlib, and Scikit-learn. These libraries do a lot of the heavy lifting for us.
- Community Support: A huge and active community means endless resources, tutorials, and help when you need it.
3. Getting Your Hands Dirty: Setting Up Your Environment
Before we can teach a machine anything, we need to set up our workspace. This module will guide you through getting your Python environment ready. Don’t worry if these terms sound new; we’ll walk through it step-by-step.
We’ll focus on:
- Anaconda: This is not just a programming language; it’s a fantastic platform that bundles Python with many of the essential data science and machine learning libraries you’ll need. It simplifies the installation and management of packages. Think of it as your all-in-one AI toolbox!
- Jupyter Notebooks (or Google Colab): This will be your interactive playground. Jupyter Notebooks allow you to write and execute Python code, display output, and even include explanatory text and visualizations all in one document. It’s perfect for learning, experimenting, and sharing your ML projects. If you prefer a cloud-based solution without any local installation, Google Colab is an excellent alternative.
This initial setup might feel a little technical, but trust me, getting it right now will save you headaches later. Once your environment is humming, you’ll be ready to truly dive into the magic of data.
This is just the beginning of an incredible journey. Get ready to transform data into insights, and ideas into intelligent systems. Your adventure starts now!
Option 1: Local Installation with Anaconda (Recommended)
Anaconda is a widely used platform for data science and machine learning. It simplifies environment and package management, meaning you get Python and almost all the libraries you’ll need (NumPy, Pandas, Scikit-learn, Matplotlib, Jupyter Notebooks, etc.) in one go!
Estimated Time: 15-30 minutes (download speed dependent).
Step 1: Download Anaconda Individual Edition
- Open your web browser and go to the official Anaconda website: Anaconda Distribution Download Page
- Scroll down to the “Anaconda Installers” section.
- Choose the installer appropriate for your operating system (Windows, macOS, or Linux) and make sure to select the latest Python 3.x version (e.g., Python 3.9 or 3.10).
- Windows: Look for the graphical installer (.exe).
- macOS: Look for the graphical installer (.pkg).
- Linux: Look for the 64-bit installer (.sh).
- Download the installer file to your computer. It’s a large file (around 500-700 MB), so it might take a few minutes.
Step 2: Install Anaconda
Once the download is complete, follow the instructions for your operating system:
For Windows Users:
- Locate the downloaded .exe file (usually in your “Downloads” folder) and double-click it to start the installation.
- Click “Next” on the welcome screen.
- Agree to the license terms.
- Choose “Just Me” (recommended) unless you’re installing for multiple users on the same computer and know what you’re doing. Click “Next.”
- Choose the destination folder. The default location is usually fine. Click “Next.”
- IMPORTANT: On the “Advanced Installation Options” screen:
- Check the box that says “Add Anaconda3 to my PATH environment variable.” (This is crucial for easily running Python and Jupyter from your command prompt).
- Leave “Register Anaconda3 as my default Python 3.x” checked.
- Click “Install” and wait for the installation to complete. This might take several minutes.
- Click “Next” and then “Finish” to complete the installation. You can uncheck the boxes for tutorials and Anaconda Cloud if you wish.
For macOS Users:
- Locate the downloaded .pkg file and double-click it.
- Click “Continue” through the introduction, readme, and license screens, agreeing to the terms.
- Select “Install for me only” (recommended).
- Click “Install” and enter your administrator password if prompted.
- Wait for the installation to complete. This might take several minutes.
- Click “Continue” and then “Close” to finish the installation. You can move the installer to the Trash if you like.
For Linux Users:
- Open a terminal.
- Navigate to the directory where you downloaded the .sh file (e.g., cd ~/Downloads).
- Run the installer script using bash:codeBash
bash Anaconda3-202X.XX-Linux-x86_64.sh(Replace Anaconda3-202X.XX-Linux-x86_64.sh with the exact filename you downloaded). - Press Enter to review the license agreement. Keep pressing Enter or Space to scroll through it until you reach the end.
- Type yes to accept the license terms.
- Press Enter to accept the default installation location, or specify a different path.
- Type yes when asked if you wish the installer to initialize Anaconda3 by running conda init. This adds Anaconda to your PATH.
- Close and reopen your terminal for the changes to take effect.
Step 3: Verify Your Installation
After installation, it’s good practice to confirm everything is working:
- Open a new Terminal (macOS/Linux) or Command Prompt (Windows).
- Windows: Search for “cmd” or “Command Prompt” in your Start menu.
- macOS: Search for “Terminal” in Spotlight (Cmd + Space) or find it in Applications/Utilities.
- Linux: Open your preferred terminal application.
- Type the following command and press Enter:codeBash
conda --versionYou should see the installed conda version (e.g., conda 23.7.4). This confirms Anaconda is installed and accessible. - Next, type:codeBash
python --versionThis should show you the Python version associated with Anaconda (e.g., Python 3.9.12). - (Optional) You can also type conda list to see a long list of all the packages pre-installed with Anaconda. Don’t worry about understanding them all now!
Step 4: Launch Jupyter Notebook
Jupyter Notebooks will be your primary environment for coding and experimenting in this course.
Method A: Using Anaconda Navigator (Recommended for beginners)
- Windows/macOS: Search for “Anaconda Navigator” in your Start menu or Applications folder and launch it.
- Linux: Open a terminal and type anaconda-navigator & (the & allows you to continue using the terminal).
- Once Anaconda Navigator loads, you’ll see a dashboard with various applications. Find “Jupyter Notebook” and click the “Launch” button.
- This will open a new tab in your web browser, showing a file browser interface. This is your Jupyter Notebook dashboard!
Method B: Using Terminal/Command Prompt (More advanced, but good to know)
- Open a new Terminal (macOS/Linux) or Command Prompt (Windows).
- Navigate to the directory where you want to store your course notebooks (e.g., cd Documents/ML_Course). Jupyter will open to this directory.
- Type the following command and press Enter:codeBash
jupyter notebook - This will also open a new tab in your web browser with the Jupyter Notebook dashboard.
Step 5: Your First Jupyter Notebook & Code Test
- In the Jupyter Notebook dashboard in your web browser, click the “New” button (usually on the top right) and select “Python 3 (ipykernel)” or “Python 3.”
- A new notebook tab will open. This is where you’ll write and run your Python code!
- In the first code cell, type the following:codePython
print("Hello, AI World!") - To run the code, either click the “Run” button in the toolbar or press Shift + Enter.
- You should see the output: Hello, AI World! below the cell.
- Now, let’s test if a common ML library is accessible. In a new cell, type:codePython
import pandas as pd import numpy as np print("Pandas and NumPy imported successfully!") - Run this cell. If you see “Pandas and NumPy imported successfully!”, then your environment is perfectly set up for AI and ML!
Option 2: Cloud-Based Setup with Google Colab (Alternative)
If you face issues with local installation, or prefer a zero-setup, browser-based environment, Google Colab is an excellent choice. It provides free access to powerful hardware (including GPUs for more advanced tasks!) and requires only a Google account.
Estimated Time: 5-10 minutes.
Step 1: Access Google Colab
- Open your web browser and go to: Google Colab
- You will need a Google account (Gmail account) to use Colab. If you’re not already signed in, it will prompt you to do so.
Step 2: Create a New Notebook
- Once you’re on the Colab welcome page, click on “File” -> “New notebook”.
- A new, empty Jupyter Notebook will open directly in your browser.
Step 3: Your First Colab Code Test
- In the first code cell (labeled In []), type the following:codePython
print("Hello from Google Colab!") - To run the code, click the play button (a triangle icon) to the left of the cell, or press Shift + Enter.
- The first time you run a cell, Colab will connect to a runtime (a virtual machine in Google’s cloud). This might take a few seconds.
- You should see the output: Hello from Google Colab! below the cell.
- To confirm libraries are available, in a new cell, type:codePython
import sklearn import matplotlib.pyplot as plt print("Scikit-learn and Matplotlib imported successfully!") - Run this cell. If it runs without errors, you’re good to go!
Troubleshooting Tips:
- “Command not found” / “python is not recognized”: This often means Anaconda was not correctly added to your system’s PATH.
- Solution: For Windows, try reinstalling Anaconda and ensure the “Add Anaconda3 to my PATH environment variable” box is checked. For macOS/Linux, ensure you closed and reopened your terminal after installation, and if you skipped conda init, you might need to run conda init bash or similar in your terminal.
- Installation Failed: Try restarting your computer and attempting the installation again. Sometimes security software can interfere; temporarily disabling it during installation might help (but remember to re-enable it!).
- Jupyter Notebook won’t launch/browser error: Try launching it from both Anaconda Navigator and the command line to see if one works. Check your browser for any security warnings or pop-up blockers that might be interfering.
- “Pip install” vs. “Conda install”: With Anaconda, it’s generally best to use conda install for packages when possible, as conda manages environments and dependencies more robustly. For this beginner course, almost everything you need is pre-installed or can be easily installed with conda install.
- Still stuck? Don’t hesitate to ask for help! Provide screenshots of any error messages you encounter, and specify your operating system.
Congratulations! You’ve successfully set up your environment for AI and Machine Learning. Whether you chose local installation with Anaconda or the cloud-based Google Colab, you now have a powerful workbench ready for your coding adventures.
Ready to dive into the data? Let’s move on to Module 1: The ML Workflow & Data Basics!